Picture this: You’re sitting at your vanity, soft music playing in the background, and your favorite nail polishes laid out in front of you.

Valentine’s Day is just around the corner, and you’re ready to add the perfect finishing touch to your look—adorable kiss mark nail art! Whether you’re a nail art pro or a beginner, these 25 ideas are easy, fun, and oh-so-romantic. From minimalist designs to bold, glittery statements, there’s something here for everyone. Let’s get started!
1. Minimalist Kiss Marks
Picture this: Your nails are painted a soft, barely-there nude. On each nail, there’s a tiny black kiss mark, so subtle yet so chic. It’s the kind of design that makes people do a double-take and say, “Wait, are those kiss marks? So cute!”
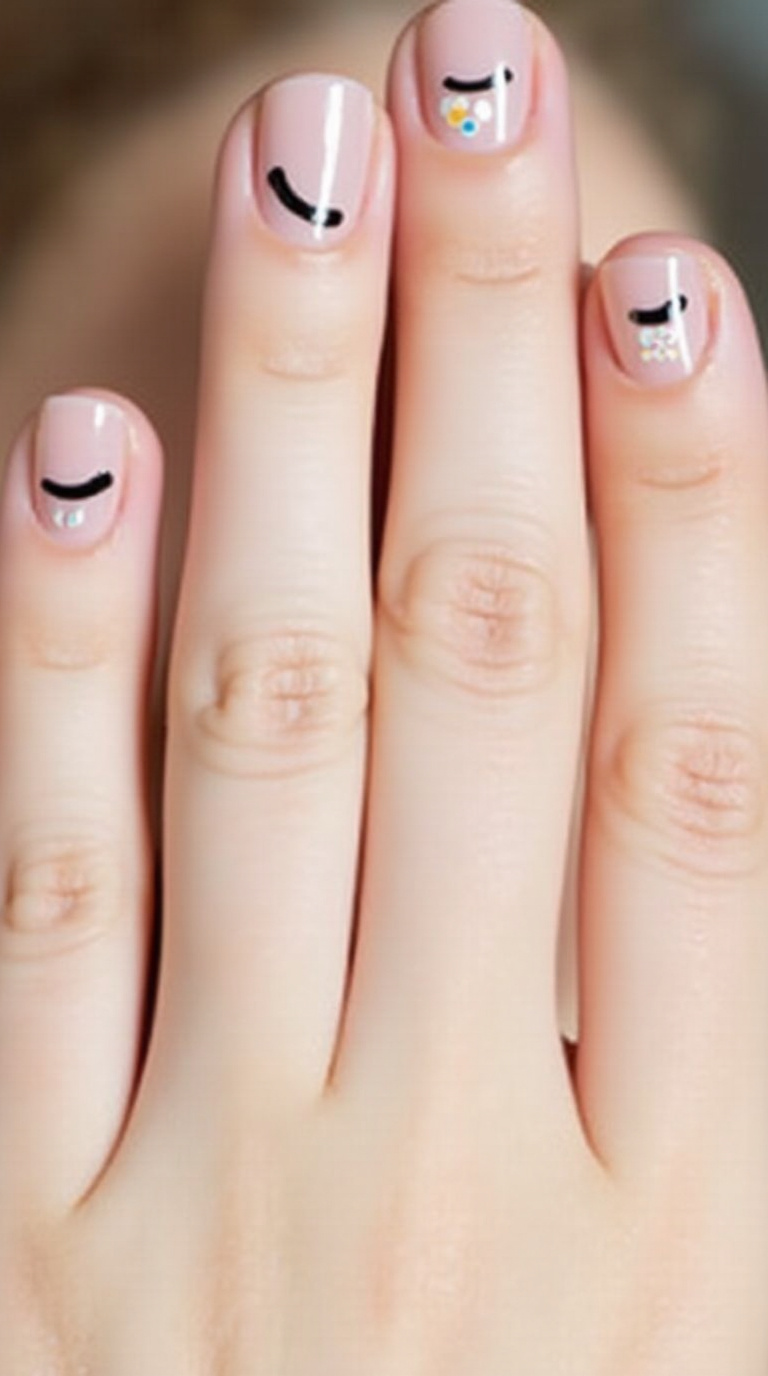
- Step-by-step:
- Apply a nude or light pink base coat and let it dry completely.
- Using a thin brush or a toothpick, dip into black nail polish.
- Create a small “V” shape (the top of the kiss mark) and fill it in slightly to form the lips.
- Add a tiny curve below the “V” to complete the kiss mark.
- Seal with a clear top coat for a polished finish.
2. Red Lips on French Tips
Picture this: Classic French tips, but with a twist—tiny red kiss marks delicately placed on the white tips. It’s elegant, playful, and perfect for a romantic dinner date.
- Step-by-step:
- Paint your nails with a sheer pink or nude base.
- Using white nail polish, create French tips and let them dry.
- Dip a dotting tool or toothpick into red polish and create small kiss marks on the tips.
- Add a top coat to blend the design and add shine.
3. Glittery Kiss Marks
Picture this: Your nails are a dazzling mix of silver glitter, and on each nail, there’s a bold red kiss mark that sparkles with every movement. It’s the ultimate glam look for a night out!
- Step-by-step:
- Apply a glittery silver or rose gold base coat. Let it dry completely.
- Using a stencil or freehand, paint red kiss marks on each nail.
- For extra sparkle, add a tiny rhinestone at the corner of each kiss mark.
- Seal with a glossy top coat to make the glitter pop.
4. Ombre Lips
Picture this: Your nails fade from soft pink at the cuticle to deep red at the tips, with kiss marks that blend seamlessly into the gradient. It’s like a sunset on your nails!
- Step-by-step:
- Paint your nails with a light pink base.
- Use a makeup sponge to dab red polish onto the tips, blending it upward to create an ombre effect.
- Once dry, use a thin brush to paint kiss marks in a slightly darker shade of red.
- Finish with a top coat to smooth out the design.
5. Heart-Shaped Kiss Marks
Picture this: Tiny kiss marks that double as hearts—double the love! Your nails are a soft blush pink, and each kiss mark has a little heart inside it. It’s whimsical and romantic.
- Step-by-step:
- Paint your nails with a light pink or pastel base.
- Using a thin brush, create a small kiss mark.
- Inside the kiss mark, paint a tiny heart using red or white polish.
- Add a top coat to seal the design and add shine.
6. Matte Black Kisses
Picture this: Your nails are a sleek matte black, and on each one, there’s a glossy red kiss mark. The contrast is striking and oh-so-chic.
- Step-by-step:
- Apply a matte black base coat and let it dry.
- Using a stencil or freehand, paint glossy red kiss marks on each nail.
- For extra dimension, add a tiny white highlight to the lips.
- Seal with a matte top coat to maintain the contrast.
7. Pastel Kiss Marks
Picture this: Your nails are a dreamy pastel lavender, and on each one, there’s a soft pink kiss mark. It’s delicate, feminine, and perfect for a Galentine’s Day brunch.
- Step-by-step:
- Paint your nails with a pastel lavender or mint green base.
- Using a dotting tool, create small kiss marks in a coordinating pastel shade.
- Add a top coat to blend the colors and add shine.
8. Gold Accent Kisses
Picture this: Your nails are a soft nude, and on each one, there’s a shimmering gold kiss mark. It’s luxurious and perfect for a fancy Valentine’s Day dinner.
- Step-by-step:
- Apply a nude or beige base coat.
- Using gold nail polish or foil, create kiss marks on each nail.
- Add a top coat to secure the gold accents and add shine.
9. Negative Space Kisses
Picture this: Your nails are mostly bare, with kiss mark shapes cut out in the polish. It’s modern, trendy, and perfect for minimalist lovers.
- Step-by-step:
- Apply a base coat to protect your nails.
- Use tape or a stencil to create kiss mark shapes.
- Paint over the stencil with a bold color like red or black.
- Remove the stencil to reveal the negative space design.
- Seal with a top coat.
10. Rhinestone Kisses
Picture this: Your nails are a soft pink, and on each one, there’s a bold red kiss mark adorned with tiny rhinestones. It’s glamorous and perfect for a night out.
- Step-by-step:
- Paint your nails with a light pink base.
- Create red kiss marks using a thin brush.
- Place small rhinestones along the edges of the kiss marks.
- Seal with a top coat to secure the rhinestones.
11. Red Lips on White
Picture this: Crisp white nails with bold red kiss marks that pop like a classic love letter. It’s clean, striking, and perfect for a modern Valentine’s Day look.
- Step-by-step:
- Paint your nails with a bright white base coat. Let it dry completely.
- Using a thin brush or stencil, create bold red kiss marks on each nail.
- Add a glossy top coat to make the red lips shine.
12. Gradient Kisses
Picture this: Your nails fade from soft pink to deep red, with kiss marks that blend seamlessly into the gradient. It’s like a romantic sunset on your fingertips!
- Step-by-step:
- Apply a light pink base coat.
- Use a makeup sponge to dab red polish onto the tips, blending upward for a gradient effect.
- Once dry, use a thin brush to paint kiss marks in a slightly darker shade of red.
- Seal with a top coat to smooth out the design.
13. Polka Dot Kisses
Picture this: A playful mix of polka dots and kiss marks on a soft pink base. It’s fun, flirty, and perfect for a Galentine’s Day celebration.
- Step-by-step:
- Paint your nails with a light pink base.
- Using a dotting tool, create small white polka dots across each nail.
- Add red kiss marks in between the polka dots.
- Finish with a glossy top coat.
14. Metallic Lips
Picture this: Shiny metallic kiss marks on a deep burgundy base. It’s edgy, luxurious, and perfect for a night out.
- Step-by-step:
- Paint your nails with a deep burgundy or plum base.
- Using metallic gold or silver polish, create kiss marks on each nail.
- Add a top coat to seal the metallic accents and add shine.
15. French Tips with Kisses
Picture this: Classic French tips with tiny kiss marks along the edge. It’s elegant with a playful twist!
- Step-by-step:
- Paint your nails with a sheer pink or nude base.
- Create French tips using white polish.
- Using a thin brush, add small red kiss marks along the edge of the tips.
- Seal with a top coat for a polished finish.
16. Glossy Lips on Matte
Picture this: Matte black nails with glossy red kiss marks. The contrast is bold, modern, and oh-so-chic.
- Step-by-step:
- Apply a matte black base coat and let it dry.
- Using glossy red polish, create kiss marks on each nail.
- Add a matte top coat to maintain the contrast.
17. Neon Kisses
Picture this: Bright neon pink kiss marks on a black base. It’s bold, edgy, and perfect for making a statement.
- Step-by-step:
- Paint your nails with a black base coat.
- Using neon pink polish, create bold kiss marks on each nail.
- Add a top coat to make the neon pop.
18. Rose Gold Lips
Picture this: Soft rose gold kiss marks on a blush pink base. It’s luxurious and perfect for a romantic evening.
- Step-by-step:
- Paint your nails with a blush pink base.
- Using rose gold polish or foil, create kiss marks on each nail.
- Seal with a top coat to secure the rose gold accents.
19. Reverse French Kisses
Picture this: A reverse French tip with kiss marks along the cuticle. It’s unique and trendy!
- Step-by-step:
- Paint your nails with a nude or white base.
- Using red polish, create a reverse French tip along the cuticle.
- Add small kiss marks along the edge of the red polish.
- Seal with a top coat.
20. Watercolor Kisses
Picture this: Soft, blended kiss marks that look like watercolor art. It’s dreamy and artistic!
- Step-by-step:
- Paint your nails with a white base coat.
- Using a thin brush, create kiss marks with red polish.
- While the polish is still wet, blend the edges with a clean brush dipped in nail polish remover.
- Seal with a top coat.
21. Glitter Tips with Kisses
Picture this: Glittery tips with tiny kiss marks peeking through. It’s sparkly and fun!
- Step-by-step:
- Paint your nails with a nude base.
- Apply glitter polish to the tips.
- Add small kiss marks using red polish.
- Seal with a top coat.
22. Abstract Kisses
Picture this: Bold, abstract kiss marks in different colors. It’s artistic and unique!
- Step-by-step:
- Paint your nails with a white base.
- Using different colors, create abstract kiss marks on each nail.
- Seal with a top coat.
23. Half-Moon Kisses
Picture this: A half-moon design with kiss marks along the curve. It’s chic and modern!
- Step-by-step:
- Paint your nails with a nude base.
- Using red polish, create a half-moon shape at the cuticle.
- Add small kiss marks along the curve.
- Seal with a top coat.
24. Floral Kisses
Picture this: Delicate flowers with kiss marks nestled in between. It’s romantic and feminine!
- Step-by-step:
- Paint your nails with a light pink base.
- Using a thin brush, create small flowers and kiss marks.
- Seal with a top coat.
25. Confetti Kisses
Picture this: Tiny confetti pieces scattered around bold kiss marks. It’s festive and fun!
- Step-by-step:
- Paint your nails with a white base.
- Add small confetti pieces using a dotting tool.
- Create bold kiss marks using red polish.
- Seal with a top coat.
There you have it—25 kiss mark nail art ideas to make your Valentine’s Day unforgettable! Whether you’re going for subtle and chic or bold and glam, these designs are sure to turn heads. So grab your nail polish, put on some music, and let your creativity flow.
Which design are you trying first? Let me know in the comments—I’d love to see your creations! 💕
With love and glitter, – Tillys 💕